
Difficulty:

medium
You will need:
- dk yarn in dark blue, red, dark brown, medium brown, light brown, cream, orange and black (many of these you will only need very small amounts of)
- A 2.5mm crochet hook (this is what you should use of the size of the hook isn't specified)
- A 1mm or 1.5mm crochet hook
- A sheet of thin, clear plastic (I used a poly pocket file)
- Some selotape
- Some cardboard
- A small amount of red checked cotton fabric (you can alternatively use white and draw the checks on with either a fabric pen or a sharpie)
- A small amount of white 3ply or 4ply yarn
- 3 small snap fasteners
- A sewing needle and brown sewing thread
- A darning needle for sewing up
- toy stuffing
- brown 4ply yarn or embroidery thread
For the bear:
Use medium brown unless specified
For the head and body (starting from the base):
Make a magic loop with 6sc
Round 1: 2sc in each st (12sc)
Round 2: sc in teh first st, 2sc in the next st, rep to end (18sc)
Round 3: sc in the first 2 sts, 2sc in the next st, rep to end. ch1, turn (24sc)
Rounds 4 - 8: (5 rounds) sc in each st (24sc)
Round 9: sc in the first 2 sts, sc2tog, rep to end (18sc)Round 10: sc in the first st, sc2tog, rep to end (12sc)
Round 11: sc in the first st, sc2tog, rep to end (8sc)
Round 12: 2sc in each st (16sc)
Round 13: sc in each st
Round 14: sc in the first 3 sts, 2sc in the next st, rep to end (20sc)
Round 15: sc in each st
Round 16: sc in the first 4 sts, 2sc in the next st, rep to end (24sc)
Rounds 17 - 18: (2 rounds) sc in each st
Round 19: sc in the first 2 sts, sc2tog, rep to end (18sc)Round 12: 2sc in each st (16sc)
Round 13: sc in each st
Round 14: sc in the first 3 sts, 2sc in the next st, rep to end (20sc)
Round 15: sc in each st
Round 16: sc in the first 4 sts, 2sc in the next st, rep to end (24sc)
Rounds 17 - 18: (2 rounds) sc in each st
Round 20: sc in the first st, sc2tog, rep to end (12sc)
Round 21: sc2tog to end (6sc)
Fasten off
For the arms (make 2):
Make a magic loop with 6sc
Round 1: sc in the first st, 2sc in the next st, rep to end (9sc)
Rounds 2 - 3: (2 rounds) sc in each st (9sc)
Round 4: sc in the first st, sc2tog, rep to end (6sc)
Rounds 5 - 9: (5 rounds) sc in each st (6sc)
Fasten off
Make a magic loop with 6sc
Round 1: sc in the first st, 2sc in the next st, rep to end (9sc)
Rounds 2 - 3: (2 rounds) sc in each st (9sc)
Round 4: sc in the first st, sc2tog, rep to end (6sc)
Rounds 5 - 9: (5 rounds) sc in each st (6sc)
Fasten off
For the legs (make 2):
Make a magic loop with 6sc
Round 1: 2sc in each st (12sc)
Round 2: sc in the first 3 sts, 2cs in the next st, rep to end (15sc)
Rounds 3- 4: (2 rounds) sc in each st (15sc)
Round 5: sc2tog 3 times, sc in the last 9 sts (12sc)
Round 6: sc in the first 2 sts, sc2tog, rep to end (9sc)
Rounds 7 - 10: (4 rounds) sc in each st (9sc)
Rounds 3- 4: (2 rounds) sc in each st (15sc)
Round 5: sc2tog 3 times, sc in the last 9 sts (12sc)
Round 6: sc in the first 2 sts, sc2tog, rep to end (9sc)
Rounds 7 - 10: (4 rounds) sc in each st (9sc)
Fasten off
For the ears (make 2):
Make a magic loop with 6sc Round 1: sc in each st (6sc)
Fsten off
With black yarn make a magic loop with 3sc, but don't join Row 1: ch1, sc in each of the 3sts
Fasten off
Sew these black bits to the front of the ears and then sew the ears to the head For the muzzle:
With cream yarn make a magic loop with 6sc
Round 1: 3sc in the first st, sc in the next 5sts (8sc)
Round 2: sc in each st to end
Fasten off
Stuff this slightly and sew it to the face
Use black eyes to embroider facial featured (eyes, a nose and a mouth) onto your bear
For the hat:
With red dk yarn make a magic loop with 6sc
Round 1: 2sc in each st (12sc)
Round 2: sc in the first st, 2sc in the next st, rep to end (18sc)
fasten off neatly
fasten on to the loop behind the back loop of one of mteh sts (see below)
Round 3: sc in the loop behind the back lop of each st (what is called the third loop in the image below)
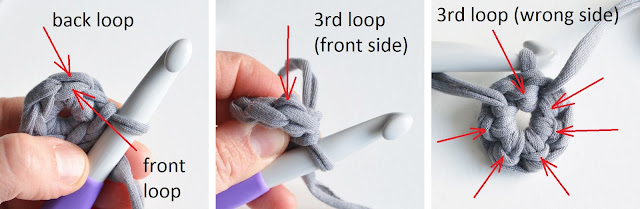 |
fasten off neatly
fasten onto the front loop of one of the stitches
Round 7: crocheting into the front loop of each st, sc in the first 2sts, 2sc in the next st, rep to end (24sc)
Round 8: crocheting into both loops of each st, sc in the first 2sts, 2sc in the next st, rep to end(32sc)
Round 9: sc into the first 3sts, 2sc in the next st, rep to end (40sc)
Round 10: sc into the first 3sts, 2sc in the next st, rep to end (50sc)
Fasten off
For the coat:
With blue dk yarn ch24
Row 1: sc in the 2nd chain st from hook, sc in every following chain st.ch1, turn (23sc)
Rows 2 - 9: (8 rows) sc in each st. ch1, turn (23sc)
Row 10: sc in the first 3sts, sc2tog. ch1, turn (4sc)
Row 11: sc in the first 2sts, sc2tog. fasten off (3sc)
Fasten off
skip 3sts from base of this section, fasten on to the next st (as shown below)

Row 10: sc2tog between this st and the next, sc3, sc2tog. ch1,turn (5sc)
Row 11: sc in each of these 5 sts
Fasten off
skip 3 sts from the base of this section, fasten on to the next st
Row 10: sc2tog with this and the next st, sc in the next 3sts. ch1, turn (4sc)
Row 11: sc2tog, sc in the next 2sts (3sc)
Row 11.5: (this is just used to get the yarn in the correct position and doesn't add any height, hence why it is row 11.5) turn, slip3, ch1, turn.

Row 12: sc2tog, sc in the next st, ch1, slip 5 on the next section, ch1, sc into the first st on the next section, sc2tog
fasten off
For the hood:
Make a magic loop with 6sc
Round 1: 2sc in each st (12sc)
Round 2: sc in teh first st, 2sc in the next st, rep to end (18sc)
Round 3: sc in the first 2 sts, 2sc in the next st, rep to end. (24sc)
Round 4: sc in the first 3 sts, 2sc in the next st, rep to end.(30sc)
Round 6: sc in each st (30sc)
fasten off
attach yarn to the coat where you fastened off. place the hood in front of where you fastened on and sc through one of the stitches on the hood and the gap you fastened on to.
sc through the next around the edge of the hood a next st along the top of the jacket. Continue doing this until you get to the last st on the top of the coat
sc through the next st on the hood and this last st along the top of the coat.
Fasten off
(if you don't understand what I mean here you can just sew the hood to the neck of the coat.)

For the sleeves (make 2):
sc 11 around the edge the armhole
(5 rounds) sc in each of these 11 sts
Fasten off
For the brown triangles (make 4):
with dark brown make a magic loop with 2sc dont' join. Fasten off
Sew these to the coat (see below for where to place them)
For the 'buttons' (make 2):
with a 1mm or 1.5mm crochet hook and light brown dk yarn ch2
fasten off

sew/tie the brown embroidery thread/ 4ply yarn around these buttons, then sew both ends of the yarn to the inner edge of the brown triangles on one side
To the other triangles sew a loop of yarn/ thread to act as a sort of buttonhole.

 |
| sorry for the blurriness |
For the suitcase:
For the top and bottom (make 2):
With light brown ch5
Row 1: sc in the 2nd st from base of chain, sc in the next 2sts to end (4sc)
Rows 2 - 11: (10 rows) ch1. turn, sc in each st
Fasten off
For the front and back (make 2):
With light brown ch7
Row 1: sc in the 2nd st from base of chain, sc in the next 4sts to end (6sc)
Rows 2 - 11: (10 rows) ch1. turn, sc in each st
Fasten off
For the sides (make 2):
With light brown ch5
Row 1: sc in the 2nd st from base of chain, sc in the next 2sts to end (4sc)
Rows 2 - 6: (5 rows) ch1. turn, sc in each st
Fasten off
For the handle:
With light brown ch3
Row 1: sc in the 2nd st from base of chain, sc in the next stitch (2sc)
Rows 2 - 11: (10 rows) ch1. turn, sc in each st
Fasten off
For the straps (make 3):
With light brown ch3
Row 1: sc in the 2nd st from base of chain, sc in the next stitch (2sc)
Rows 2 - 4: (3 rows) ch1. turn, sc in each st
Fasten off
Sew the back, sides and top/bottom together into a open-topped box shape. Then sew the bottom edge of the front side to the bottom edge of the suitcase, so that it opens up.
 |
| This is kind of what your suitcase should look like, minus the front flap bit |
Sew the handle onto the top of the suitcase, then sew the straps to the open edge of the front of the suitcase. Sew the snap fasteners to the suitcase: one side should be attached to the free end of the straps, the the other end should be attached to the 'top' side of the suitcase


For the letters:
For the P:
Chain 10
For the B:
Chain 15
Loop these chain sts into position on the front of the suitcase (as shown below, then sew them in place


For the sandwich:
For the bread (make 2):
With medium brown ch4
Row 1: sc in the 2nd st from hook, sc in the next 2sts. ch1, turn
Rows 2 - 3: (2 rows) sc in each st. ch1, turn
Row 4: 2sc in the first st, sc in the next 2sts, 2sc in the last st.
Fasten off

With dark brown yarn sew around the edge of each piece of bread to form the crust.

For the marmalade:
with orange yarn ch3
Round 1: sc in the 2nd chain st from hook, 3sc in the next chain st, 2sc in the back of the first chain st you crocheted into (6sc)
Round 2: 3sc in the first st, sc in the next st, rep to end (16sc)
Slip the next st and fasten off
Sandwich this marmalade in between the two slices of bread and sew them in place.


For the pots of marmalade (make 6):
Using orange make a magic loop with 6sc
Round 1 - 2: (2 rounds) sc in each st
Fasten off

Next cut a strip from the plastic approximately 4cm x 1.7cm. Curl it into a tube and tape in place. After this cut a circular piece of plastic with radius of approximately 6.5mm and stick this to the bottom of the tube using sellotape, so that you have a hollow tube that is closed on one end. put then orange crocheted section you just made inside this tube, then cut another circular section of plastic the same size as the last piece and tape it onto the top of the tube, enclosing the crocheted section inside.
Cut a circular piece of cardboard with a diameter of approximately 7mm and tape or glue this to one end of the tube.

Next cut a square piece of the checked fabric approximately 5cm wide. Fold this over the cardboard and tie a length of white 4ply yarn around the edge to keep it in place.


Place these pots inside of the suitcase


No comments:
Post a Comment